The technical bits

Published on Tuesday March 20th, 2007

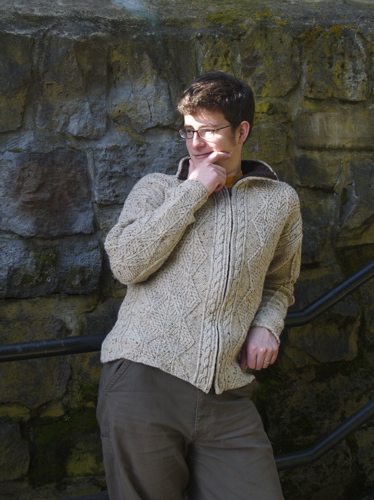
I haven’t forgotten that I promised some more construction details for the Fishtrap Aran. Mr. Garter has been wearing it regularly (I think he slept in it one night when he crashed on his parents’ couch after a late-night work session with his dad) – so regularly, in fact, that he’s already fuzzing up the collar lining. It didn’t begin to occur to me that the mature gentlemen among us grow bristly little hairs out of their necks and chins that have the same effect on soft wool yarns as wire brushes. Curses! Mr. Garter is under orders to shave twice a day if he wants to zip his Fishtrap all the way up. I’m partly kidding, but he gave me this innocent look and said, “Well, isn’t that why you put a liner in it? So you could take it out and knit me a new one whenever I need it?” I think I hardly need to describe the dirty look he received in return. Here’s the collar lining all pretty and new:

FAconstruct_collar.jpg
For those of you wondering about the zipper insertion and finishing technicalities, here’s some more detail. I began with a crochet steek. There seem to be several different methods floating around on the internet with excellent tutorials, but I did it the simple way Jen taught me.

1) Leave an extra allowance of three stitches for the steek when you begin the knitting. Twist the stitches on either side of this column for a neat, crisp edge.

2) Weave a line of bright waste yarn down the center of the stitch you’re going to cut – the middle column of the three.

3) Here’s a diagram of your three stitch columns:

\/ \|/ \/
\/ \|/ \/
\/ \|/ \/
123456

The numbers correspond to each side of the stockinet V’s. The vertical lines down the center are your waste yarn, marking the steek line. This is where you’ll cut.

4) Using a finer weight yarn that matches the main sweater yarn (I used Jamieson Shetland Spindrift in Moorit, which matched the Ballybrae Blainin Tweed beautifully), crochet a single chain line by inserting the hook under 5 & 4, drawing through a loop, inserting the hook under 5 & 4 in the next row down, etc. Then chain together the 2’s & 3’s in the same manner up the other side. For an armhole steek, you’ll work a continuous chain down one side, under the bottom of your steek line, and up the other side. For full cardiganization, you’ll want to let your chain trail off to either side at the tops and bottoms for a few extra stitches to secure your work. Later you can unpick these extra stitches and weave in the resulting end. At any rate, you never want to cut across your crochet chain.

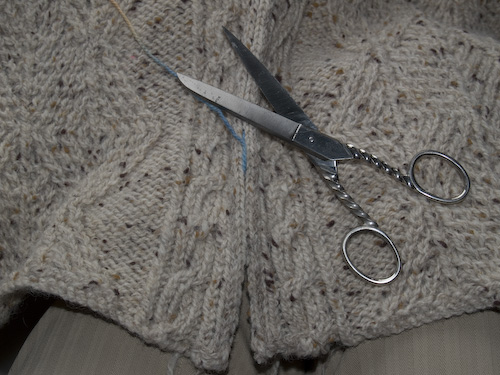
5) Cut along the line between 3 & 4, which you marked with your waste yarn, pulling the waste yarn out as you go along. It’s really easy to see the little horizontal bars to cut if you’ve done your crocheting properly – you’d have to work at it to cut in the wrong place.

6) The cut edges will naturally roll inside, and with some handy steam action from an iron, you can easily persuade them to stay there. You want the crease to leave your neatly twisted edge stitches, well, right on the edge.

For the armholes, you’ll want to tack down the cut edges on the inside in the same yarn you used for the crochet job. I used a herringbone stitch per EZ’s instructions – very tidy indeed. As you can go along, you can tuck in any raggedy cut strands that might be rearing their heads, and the herringbone stitch will batten them into place, never to worry you again. Skim the thread or light yarn through the body stitches so it won’t be visible from the outside of the sweater.

Now sew in your sleeves, attaching them to the running bars between the twisted edge stitches and the crocheted edge. I promise, it will be obvious what I mean. This leaves your twisted stitches as a neat divider between sleeve and body.

Time to sew in your zipper. For the love of Pete, make sure it’s the right length. Insert yourself or your subject into the sweater and double-check your zipper length. Begin by pinning the zipper in place. I used these nifty two-prong pins my mother-in-law gave me. I have no idea what they’re actually called, but they worked perfectly. Make sure the steeked edge stays rolled under as you pin. With thread that matches the sweater yarn, whipstitch the 1’s and 6’s to the zipper about half a centimeter from the teeth. Use small stitches, or the zipper won’t feel firmly attached to the sweater fabric and may not stand up to manly tugging. (I wouldn’t want to test it, would you?) The whole zipper sewing process is easiest if you unzip the portion you’re working on.

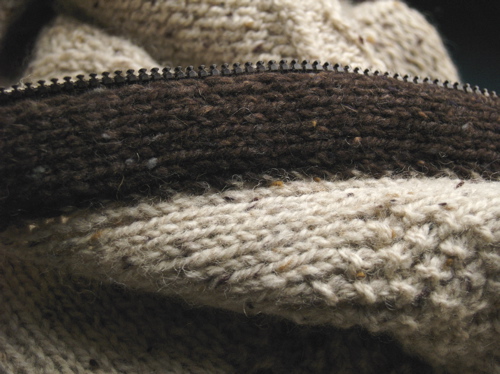
Once the zipper is in, you can sew in ribbon facings to cover the back of the zipper, or you can do as I did and knit contrasting facings. A six-stitch stockinet strip worked well for me. Again, when sewing it in, skim the needle through the surface of the sweater fabric, but do not penetrate or the stitches will show through. Last of all, work two lengths of i-cord in the sweater yarn – I made a four-stitch cord – to conceal the zipper from the outside. This also has the virtue of covering any ugliness that may have happened in the whipstitching.

Pictures. Want pictures? Of course you do.

FAconstruct_sleevejoin.jpg FAconstruct_armhole2.jpg FAconstruct_armhole.jpg

FAconstruct_zipper.jpg FAconstruct_facing.jpg FAconstruct_zipper2.jpg

Clockwise from upper left: the sleeve join, right side; inside of armhole steek showing herringbone stitch; different view of armhole steek; zipper, showing slatternly whipstitch attachment; zipper facing on the inside; i-cord concealing zipper from the outside.

I know it’s hard to see the herringbone stitch. If this were a proper tutorial, I’d have done it in a bright color so you could see the thread. But I was going for tidy and unobtrusive.

I’m intrigued by the sculptural and textural properties of this sweater, especially when it’s all crumpled and inside-out. The Fishtrap pattern is a freaking piece of art. Elizabeth Zimmermann sure knew what she was doing.

Spring fishing

Published on Tuesday March 6th, 2007

It springeth!

daffodil.jpg maple_buds.jpg magnolia.jpg

And in Portland, days like this in the month of March are the result of divine intervention. I snatched up the camera and went hog wild. And then I sat out on the deck and finished the Fishtrap Aran, because I knew it could be weeks before I got such another opportunity to bundle Mr. Garter into it and capture the momentous occasion on film.

Drumroll…

FSA_laugh.jpg

Elizabeth Zimmermann’s Fishtrap Aran, the January project from Knitter’s Almanac

Ancient Brunswick Ballybrae Blainin Tweed, resurrected from a 30-year-old project of Mr. G’s mom’s, plus some Rowan Yorkshire Tweed DK for the collar lining and zipper facings. Psst, want to see?

FSA_facing.jpg

(Apologizes in advance for any retina damage caused by Mr. Garter’s T-shirt. My man likes a little color.) The zipper is not original to the pattern, but I decided it would look more youthful and fresh on my hubby than a button band. Plus, it was a challenge: I’d never sewn one in before. Of course, cardiganizing* the sweater in any fashion was going to reveal the private insides. Not that Fishtrap’s insides are unsightly, but you all know what the back sides of cable patterns look like. I felt they could use a little tidying, and I definitely didn’t want my less-than-Victorian handstitching skills to show around the zipper. Grosgrain ribbons are favored by many for zipper facings, but they don’t seem all that manly, somehow, and they stiffen the edge in a way that I worried would compromise the fluidity of the knit fabric. So knit facings it was. And i-cord trim to hide the zipper from the outside. Oh, let’s have some more pictures.

FSA_backhoe.jpg FSA_andromeda.jpg FSA_bw.jpg FSA_pose.jpg

Mr. Garter gets a little twitchy during photo shoots, but as the recipient of a such a nice sweater, I thought he owed it to me to submit to my every whim a few pictures. Okay, maybe thirty or forty pictures. He got a little goofy on his catwalk, as you can see. Doesn’t he look like a beefcake in his handsome cardi, though?

It’s a snug fit, as he wanted. He particularly specified that the body should not hang like a tent, and that it should fit closely at the hips. I went down a needle size for the first ten inches or so to ensure that this would be the case, and I think it was the right move. I’m particularly pleased about the sleeve length, too. Mr. Garter has very long arms, but I stayed the course. Actually, I’m particularly pleased about the whole darn sweater. It was a lot of work, but it was worth it.

Do I get a w00t, honey?

* Thanks to apparently blogless fellow Zimmermaniac MeowGirl for introducing this great verb into the knitterly lexicon.

Screeeeeeeech!

Published on Friday February 23rd, 2007

That’s the sound of me applying the brakes to this whole zipper odyssey. Oh lordy, you’re all right: of course the sweater is going to spread width-wise and get SHORTER when it’s on an actual man and not just my ironing board. (And of course Grumperina thought of that ahead of time, as I clearly failed to.) We may be going back to the 28″ zipper, in which case I’ve ripped out a perfect good half a sewing job and – you guessed it – spent an hour and a half of Grey’s Anatomy last night on a new half a sewing job. Let’s see if I can wrestle Mr. Garter into this thing without perforating his handsome torso to check.

Hmmm, where is he?

Mr. Garter is conveniently not located in the house. Either he went running or he’s holed up in some coffee house having a codefest with his geek brethren. What is it with men (or maybe it’s all domestic partners) and their inability to leave a note? Can he not feel the tug of my fevered brainwaves longing to bundle him in wool and pins to ascertain my fate?

Whatever. I’ve spent so many hours on this sweater already that a third zipper installment is a mere drop in the ocean. It will be perfect, dammit.

Aphorism

Published on Wednesday February 21st, 2007

noun

a pithy observation that contains a general truth, such as, “if it ain’t broke, don’t fix it.”

or, “don’t buy a zipper until you’ve cut your steek.”

But let’s begin with the steeking:

Fishtrap_folded.jpg

1) Weave a contrasting piece of waste yarn down the steek line to be darn sure it’s going in the right place.

2) Crochet a chain down either side of the stitch column to be cut.

3) Muster courage, and Ancient German Scissors; haply some Grandmamma Craft Juju doth linger in their blades.

Fishtrap_steek1.jpg

4) Very. Carefully. Snip. And snip, and snip, and snip.
Fishtrap_steek.jpg

As you drag most of a worsted wool sweater all over town for months, it gets bulkier and bulkier. It fits into fewer and fewer of your knitting bags. Soon you’re lugging it about in one of the canvas grocery totes. It has grown so large and obstinate, so awkward to manipulate as you knit in the round, that it seems to have a certain indestructible life of its own. But when you vivisect it from stem to stern, how delicate the fabric feels! How vulnerable to the dangerous steel of the scissors!

At last, the steeking was done. I fired up the iron and dampened a dishtowel to steam the cut edges into submission. I pinned in the zipper. And this is where I should have stopped.

Fishtrap_shortzip2.jpg

You sharp-eyed readers will already have stooped on the problem twitching in the tall grass: the 28″ zipper, which seemed so perfect pre-steeking, is no longer long enough. The darn front of the sweater GREW. Maybe it was the release of tension from the neighboring stitches after the cut. Maybe it was the steam ironing.

Fishtrap_shortzip1.jpg

There’s a formula I need to learn:

when subject = craftsmanship and thought = “I can live with it”, action = force quit

Why did I think it wouldn’t be all that bad if the zipper was 3/4″ shy of the bottom and 1 1/2″ shy of the top? What possessed me to go ahead and hand sew half the cursed 28″ zipper in anyway?

This morning I came to my senses. I carefully measured the front against the back. Maybe the cut edge was just drooping and I could re-sew the 28″ zipper, carefully squinching the fabric back to its former shape along the way. The photo above makes it look like that’s the real problem, but it isn’t so. I needed a 30″ zipper.

Grumbling about Mr. Garter’s long torso, I drove all the way across town to the best place for zippers, the place I found the offending 28″ jobbie. I marched to the zipper section. Oh horrors. There were no brown 30″ zippers. The saleslady thought there probably never had been; it’s an unusual length and they mostly stock black or white ones. No, she didn’t advise buying the 36″ brown one and cutting it; this would only cause me grief with a molded-tooth dual separating zipper. I gnashed my own molded teeth. I thought about substituting an off-white color, but Mr. Garter had been so taken with the brown, and I’d bought a dark brown tweed yarn for the facing and neck lining to coordinate with it. I looked at all the options. I would have settled for a single-ended model, but they didn’t exist in the right length and color either. I even crawled in under the dangling zipper ends in the display to be certain no 30″ browns had fallen of their hooks and might be lying forgotten in the dark.

And just as I was about to admit defeat and drive home empty-handed, there it was, skulking behind some black zippers. 30″. Cloister brown. (This must be the dual separating sport zipper the Franciscan monks favor for their parkas.) It felt warm and pliable in my hand as I lovingly bore it to the cash register.

Mr. Garter’s Fishtrap Aran now has three zippers, hence today’s aphorism. Hopefully Goldilocks has got it just right this time. Now to unpick all my careful little stitches of last night. A six-year-old living a hundred years ago would have laughed at my slatternly basting job, I’m sure, but I was sewing the stitches as evenly and unobtrustively as I could and making sure they were sturdy enough to stand up to man-handling. The mens, they are not so gentle with the garments, after all. Ah well, I’m going to think of it as practice for the real zipper insertion, which will commence post haste.